Here's how you can log every fishing trip and every fish, and make them count for conservation.
Let's take a short break from the “why you should log” messaging, and shows you how. How to download the app, create a profile through your phone, and log your first trip.
To take the first step towards a #brighterfishingfuture for everyone, all you need to do is visit your app store and download iAngler.
Of course, nothing is that easy… we don’t pay for ads, so when you search ‘iangler’ in your app store search engine, the top app you’ll see is probably going to be a different fishing app. Go ahead and download that too if you’d like – just keep in mind that unless the app says that it is part of the iAngler family, the information you enter into it won’t fit into our database, nor will it help with conservation. It isn't one of ours.
You’ll probably also see the iAngler Tournament app. That is one of our more popular apps and is great for fishing tournaments – but for everyday fishing trips, the orange iAngler app is the one you are looking for.
First time use of app
Once you have downloaded the app, the first thing you need to do is register. This is a pretty straightforward task, and you start by touching the red ‘register’ button at the bottom right of your device. This is the only time you will need to perform this task.
There is some key information that is required when setting up your registration. You’ll need to enter your name and email, and create a username and password. We also ask for your phone number.
The username and password are what keeps your information in the system safe from other users. Nobody else can see your locations or data unless you show them yourself.
The email is needed in case we have to reach out to you with update information, etc. We also ask for your phone number. We’ve never sent out any kind of mass text, but if we ever feel that we should contact you directly, both the phone number and email are helpful.
Some reasons we’ve contacted users in the past include helping them use the app (sometimes phone updates generate bugs), consistent trip reporting errors, asking anglers to help with specific projects in their geographic region or fishing interests.
You’ll note that you are able to connect iAngler to your Facebook and Twitter accounts. This is optional – iAngler is not designed to be a social app, but we do realize that many of us like to share our general fishing activity online. Note that your locations will not automatically appear in your social posts through iAngler.
The last field in the registration page is the affiliation. Here you will find a list of all of the organizations that participate in iAngler. These include fishing clubs, conservation groups, state agencies, and more. If you don’t see an affiliation that makes sense for you, you can select ‘none.’ Affiliations are listed alphabetically. Note that the very last one is called “z – internal use only*”. This is for practice trips, or for us to test new versions, and the data in this affiliation is purged before being used for any functional purposes.

Once you have registered in iAngler, you can log in using your new username and password. By the way – your username is not case sensitive, but your password is.
Once logged in, your next step is to build your personal profile.
This is important as it customizes the app for your most typical use and makes logging much easier and faster for you. It will also help us understand fishing activity better, and this comes into play as we compare our data with traditional stock assessment methods.
Here’s how to set up your personal profile:
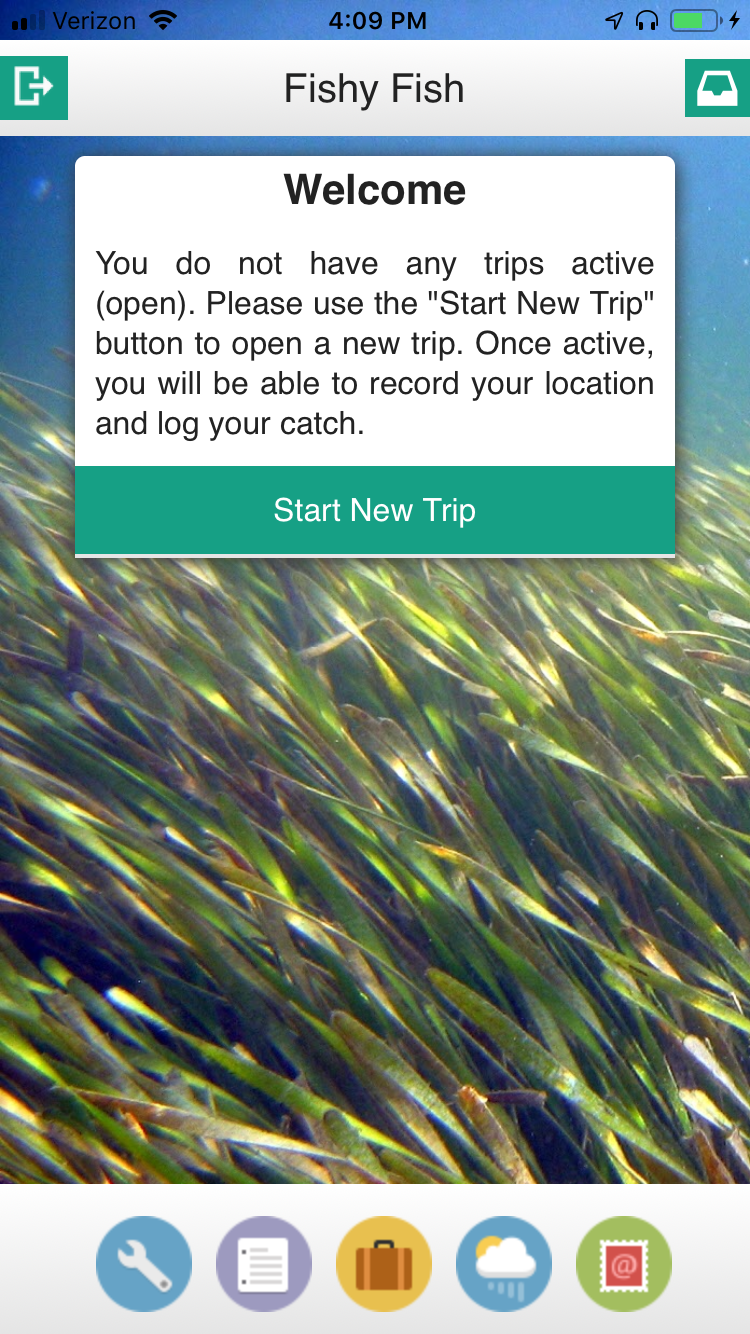
When logged in, you’ll see the Welcome page. Here you can start a new trip, check weather, look up fishing regs around the country, and other things.
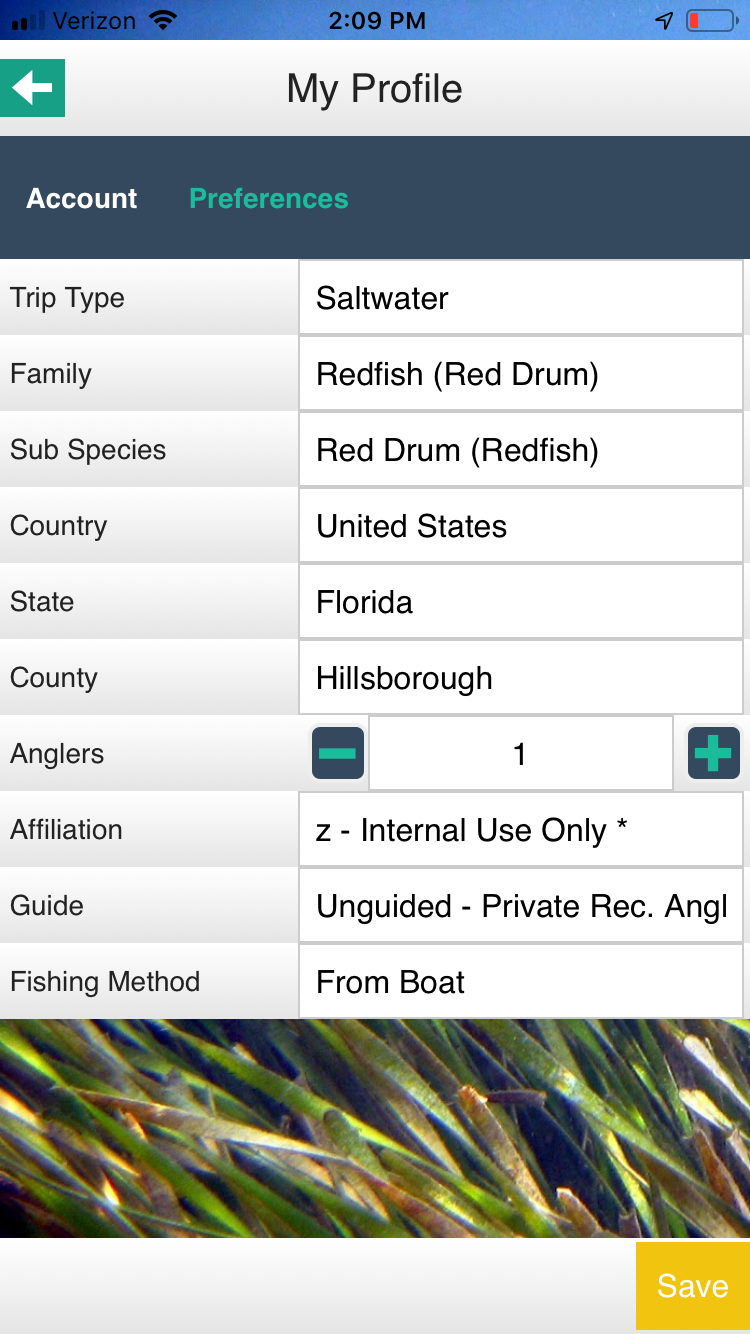
To get to your profile information, select the wrench icon at the bottom left of the screen. This takes you to your account information, which you entered when you initially registered. At the top, you can select ‘Preferences’.
Here, you’ll see ten fields that you can populate with custom preferences. From top to bottom, here’s how to determine which makes sense for you.
- Trip Type – Select which option is MOST typical for you, freshwater or saltwater.
- Family – Pick the family of the fish which you catch the most. Bass, drums, billfish, etc.
- Sub Species – Pick the species which you catch most often, such as snook, large mouth bass, etc.
- Country – Select the country you fish in most often.
- State – Select the state you fish in most often.
- County – Select the county you fish in most often.
- Anglers – Select the typical number of anglers you will be logging for. If usually solo, pick 1.
- Affiliation – You can change this selection from the drop down menu here.
- Guide – Select your typical trip type. Options include guided versus unguided, commercial, etc.
- Fishing Method – Options include “from Boat, from Bridge,” and others.
Once you have completed your preferences, select the yellow ‘save’ button at the bottom right of the screen.
Once you have completed your preferences, select the yellow ‘save’ button at the bottom right of the screen.
This information is synchronized into the system, and will follow your account no matter where you log. Before logging your first trip, we recommend closing the app completely then re-opening it. This will help complete the synchronization process. When you open the app, you’ll see that your username and password are saved – as long as you don’t allow someone else to log in on your phone, you won’t have to enter your username and password every time.
To log your very first trip, you can just back-log your most recent trip.
Logging your first trip
Start by selecting the big green “Start New Trip” button in the middle of the screen.
The first page you see will include your profile information. If this trip matches your typical info, the only field you will need to change is the date – make it match the trip you are reporting.
You can name each trip as well to help you find specific trips once you start to build up your library.
Once all information is correct, select the red “Next” button at the bottom of the screen.
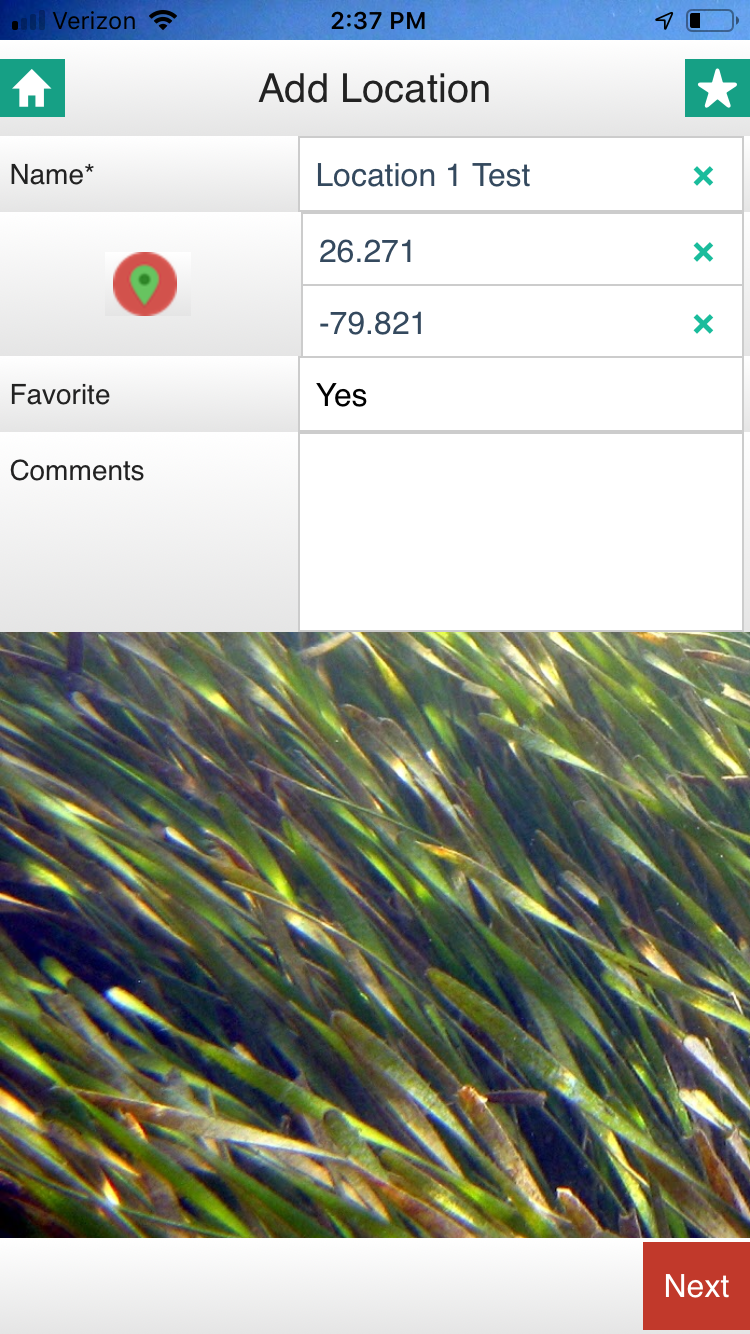
The next page is the location page.
The location feature is powerful. You can enter a new location by selecting the green location icon near the top of the screen. From there, you can use your GPS to capture your current location or select the red “choose on Map” to move the pin manually.
You do NOT need to enter a specific location. In fact, you can bypass this page completely. However, we recommend that you at least NAME your locations even if you don’t provide the specifics. Here’s why:
First off, for the purpose of stock assessments, we only need to know the county and state you fished in. So while specific location data is fantastic for many other reasons, you don’t need to share that with us.
Note the green star at the top right of your screen. Touching that icon will access your list of ‘favorite locations.’ You can make a new location become a favorite by tapping the word “no” in the box next to “Favorites”.
This allows you to quickly enter your location next time you fish in that spot.
It also allows you to start to make sense of your personal fishing patterns. You’ll be able to search and sort your trips by named location. This information allows you to enter weather, tides, and other valuable data points to better understand what makes your favorite spots successful. This will allow you to plan your trips like a pro!
Submit your location by selecting the red button at the bottom right.
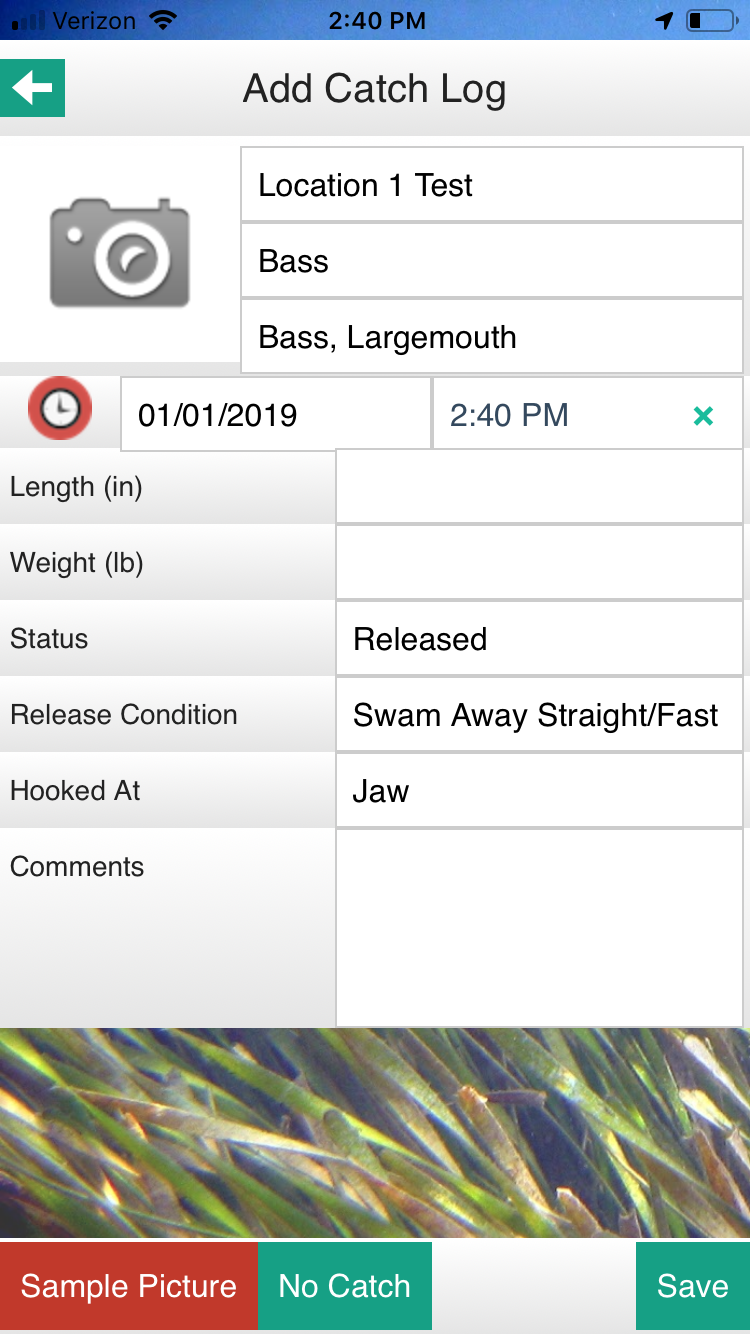
Time to enter your fish!
The most important entry on this page is the species. Change the family or sub species by selecting the pre-filled species and selecting your fish from the drop down menu.
You can enter photos of each catch by tapping the camera icon at the top right.
Enter the length by touching the blank box to the right of the word “length”.
Select the status of the fish – kept or released.
If released, enter the released condition. “Swam away straight/Fast is the default option because over 80% of fish caught fit this category. You can enter other information such as ‘eaten by predator’ or other options in this very valuable field.
Finally, the “hooked at” field is another important one for research. “Jaw” is also the typical selection by a very large margin, but there are other options to select from.
Selecting “save” at the bottom right will enter your catch into the que for this trip.
You will see each catch entered for the trip, and you can edit or duplicate each catch by using the blue edit button or yellow duplicate button to the right of the catch.
The duplicate catch button comes in very handy when you are fishing schooling fish such as sea trout, mackerel, and a host of others by allowing you to quickly enter many fish. There is no limit to the number of times you duplicate a catch, and you can edit length during the duplicating process.
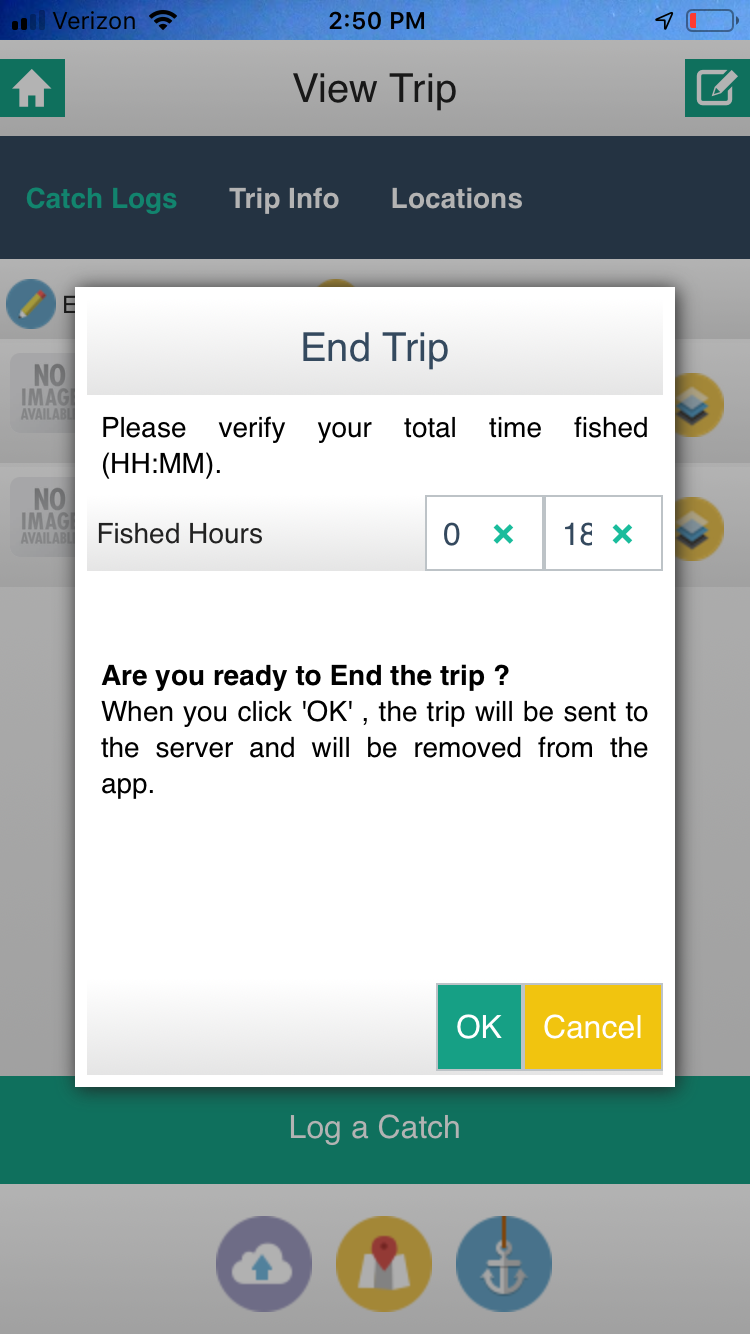
Wrapping up your trip.
To end your trip and synchronize all of the data into your personal log book and the iAngler database, select the blue anchor at the bottom of the screen. A box will appear that shows the time fished in hours and minutes. Edit the time as necessary – this should reflect the amount of times with ‘lines in’ during your fishing trip, estimated to the nearest 15 minutes.
Once the time is correct, select the green “OK” button to close the trip. After a few seconds, you should see a “Success” message which you can close by again selecting “OK”.
You are now a pro, and ready to log your next trip, and every trip after that!
Our most prolific user, Pete Squibb, has logged over 1500 trips and uses the data he has generated to increase his personal catch rates. You can do the same for yourself, and through iAngler it is completely free. It also benefits conservation in numerous ways.
So there you have it. If you read this entire article in one sitting, you spent more time reading than you will logging for the next month, even if you fish every day! It will become that fast and easy. There is no better way for you to learn your personal patterns and habits, and then apply that knowledge towards improved fishing trips for the rest of your life.
See you on the water!